Thursday, January 14, 2010

Measurement & Verification System


I am over due in updating progress regarding how we are doing regarding our efforts to achieve net zero. Presently we are nearly complete with the installation of a measurement and verification system, this will be a tremendous help in identifying how the project is performing.

We have attempted to monitor the temperatures in the large tank, domestic hot water and the sand and taconite solar thermal areas via hand recording these temperatures as well as the room set temperatures, outside temps, and the amount of wood burned.

Between December 16 and December 26 the home was without heat, due to a boiler malfunction and the system unknowingly being shut down. When I arrived on December 26, 2009 the temperature in the home was 51 degrees. This was 10 days with subzero temps and cloudy days. Note to self that heat from the storage area below the slab of the home as well as the Passive House performance is keeping freezing temperatures from occurring regardless if there is a mechanical system there to provide heat.

For those interested in details, the measurement and verification system that we are using to data log how the building is performing is as follows:

We are using a “Nigara” controls system, where all data is being sent so that it can send the information to us via a web site. The following is a list of the items we will be measuring:

BTU’s needed to heat the home
BTU’s collected from the solar heat evacuating tube collection system
Ground source heat used to preheat incoming ventilation air.
HRV defrost mode
When the HRV is in operation (blowers)
Taconite solar storage
Sand solar storage
Large Water Tank Storage
If the boiler is operating
PV being put into the grid
PV being used from the grid
Room temperatures in four areas
Outdoor temperatures
Domestic Hot Water Temperatures
Pump operations status
Wet floor conditions

I will post a link to the website once we get it operational this week. Bill Gausman of Peoples Electric is providing an amazing system for us to use.

Wednesday, January 7, 2009

92 Solar Heat Collector Vacuum Tubes


The installation of 92 solar heat collector vacuum tubes began the first week of the new year. We are hoping that the collection of heat and the distribution system for heat will be completed this month. Stay tuned.

Monday, January 5, 2009

Air tightness test

The Isabella Ecohome project team is determined to prove that we can meet or exceed the air tightness required by the The Passive House Institute US,(PHIUS). PHIUS requires the air exchange rate of a Passive House building shell be limited to 0.6 air changes per hour in reference to the buildings ventilated volume of the building, at 50 pascal pressure differential.
One serious lesson learned during the design and construction of this project was the importance of air tightness.


Here is a well written article from the Passive House reference material that describes the importance of air tightness.
Architects of passive houses are familiar with the design of high quality and enduring joints. There are special products to facilitate airtight external construction. The exhibition held during Passive House Conferences is a valuable source of innovative and effective solutions to achieving air tight construction.


Of course details are important - be decisive is a well designed basic approach! An envelope can be airtight only if its consists of ONE undisturbed airtight layer enwrapping the whole volume. For each component of the envelope it must be specified, which part will form the airtight layer (e.g. the particle board or OSB in a roof construction). In a second step it has to be determined, how the airtight layers of the components will be connected to guarantee an enduring air tightness.


Insulation materials generally are NOT air tight. Therefore, the airtight envelope has to be designed and built separately. In timber constructions in most cases wooden composite boards are used (taped at the joints), in masonry construction a continuous inside plastering is sufficient. It is important, that the airtight envelope is continuous, without interruptions. This must be designed for, with particular attention to joints.

The external envelope of a building should be as airtight as possible - this is true for conventional as well as for passive houses. It is the only means to avoid damage caused by condensation of moist, room warm air penetrating the construction (see the figure on the left hand side). Such damage not only occur in cold climates; in hot and humid climates the problem can occur from airflows from the outside to the inside. The cause is the same in both cases: a leaky building envelope.


Drafts in living spaces are not tolerated by occupants any more: Therefore a very airtight construction is essential to fulfill modern thermal comfort expectations. Most building codes, worldwide, require airtight building

Air tightness should not be mistaken for insulation. Both qualities are essential characteristics of a high quality building envelope, but in most cases both have to be achieved independently:
  • A well insulated construction is not necessarily airtight, too. Air can easily pass through insulation made from coconut, mineral or glass wool. These materials have excellent insulation properties, but are not airtight.
  • On the other hand an airtight construction is not necessarily well insulated: e.g. a single aluminium foil can achieve excellent air tightness, but has no relevant insulation property.
  • Air tightness is an important, but not the most important requirement for energy efficient buildings (contrary to the impression given by some popular publications). Further, achieving air tightness should not be mistaken with the function of a "vapor barrier". The latter is a diffusion tight layer: An oiled paper e.g. is airtight, but it allows moisture vapor to pass through. Conventional room plastering (gypsum or lime plaster, cement plaster or reinforced clay plaster) is sufficiently airtight, but allows vapour diffusion.

Infiltration can not guarantee good indoor air quality. Houses built in Germany after 1985, for example, are so airtight that infiltration alone is inadequate to assure acceptable indoor air quality. Yet, these houses are still at risk regarding moisture damage to the construction from moist room air exfiltration. A greater level of air tightness is needed and these houses must be considered as "untight". Their n50-air leakage varied between 4 and 10 h-1. The consequences are draft-discomfort and moisture damage to the construction. The construction was too leaky to avoid exfiltration caused damages - but too tight for sufficient infiltration to maintain room air quality.

The new 2001 German building code ("EnEV" Energy Saving Standard) for the first time addresses the air tightness of new constructions. Without a ventilation system the n50-airchange- values have to be less than 3 h-1, with ventilation systems 1.5 h-1. From the experience in low energy houses we recommend tighter construction (lower n50) leakages.
In passive houses far better n50 leakage rates are frequently achieved. The requirement is n50 not greater than 0.6 h-1. In practice values between 0.2 and 0.6 h-1 have been measured in passive houses.


Air tightness is not a question whether a construction is massive or light weight. Built passive houses using masonry, timber, prefabricated, lost frame with concrete and steel bearing structure have achieved this superior level of air tightness. Sören Peper, a scientist at the Passive House Institute, proved by a systematic field study that n50 leakage rates between 0.2 and 0.6 h-1 can reproducibly be achieved today. Careful design and accurate workmanship are the prerequisites to success. Construction details needed to achieve tightness are available for all important joint and envelope penetration situations.
A key principle is maintaining "an undisturbed, airtight envelope", which can be recognized by the "rule of the red line" (see the section in the third figure on the left hand side).
If a construction is not sufficiently airtight, moist room air can penetrate into the construction, condense and cause damage. The problem can be solved by thorough, air tight design.
Air tightness is not a mere nicety of energy saving construction, it is essential to avoid construction damage. Gaps in the construction will lead to substantial humidity transport by convection.

Isabella Ecohome air tightness & insulation approach

The air tightness for the Isabella Ecohome was achieved by first using a closed cell polyurethane spray foam insulation for the difficult to access areas. The product used was UCSC Polar Pro 1.9 the new name for the product is PP 1.1 by Bayer. This is both an air barrier and an insulation product. Here is an excerpt from US Department of Energy’s EERE site regarding closed cell polyurethane spray foam insulation. (http://apps1.eere.energy.gov/consumer)

While this type of insulation has greatly improved the ozone depleting blowing agent problems they have had in the past, it is still a hydrocarbon product so we tried to limit the use of it wherever possible.

We filled the majority of the cavities of the double wall system and the attic spaces with a dense packed cellulous material. We used Weather Blanket supplied by Modern Insulation, (http://moderninsulationinc.com/), which is a high quality, all-borate, loose-fill cellulose insulation for use in blowing caps in attics and in dense-packing wall and ceiling cavities. It was installed by Dave Joice owner of a company called “The Carpentry Works”.

Weather Blanket is composed of:
  • Over-issue newsprint (yesterday's unsold newspapers), which is the cleanest and highest quality paper available

  • Boric Acid, a highly effective fire retardant

  • A small amount of a light white mineral oil for dust controlCellulose insulation complies fully with CPSP standard HH-I-515E; 16CFR 1209; and ASTM C-739. It is made from cellulosic fibers derived primarily from recycled, over-issue newsprint. This, along with hand sorting, virtually eliminates plastic and trash from our insulation, making it cleaner, less dusty, and more installer friendly. None of these fibers are sourced directly from wood.


In all applications, bags of cellulose insulation are placed in an industrial-quality blowing machine. The product is then blown through several hundred feet of 2" to 3" hose, either into attics or dense-packed into wall cavities. In new construction applications, the wall cavity is formed by stretching and stapling synthetic webbing or poly sheeting across the open-faced studs. A slit is made in the webbing for the hose, the hose is inserted, and the cavity can be viewed as it is filled with dense-packed cellulose insulation. The Sheetrock® is then installed on the studs over the membrane.


The R value of our walls was calculated to be 31, 51 and 60 respectively for each of the wall types. The majority of the wall has an R value of 51. The roof has a R value of 100. With temperatures reaching record lows of 60 degrees below zero F, you can start to understand the importance of insulation and the challenges we faced for this home.

After the insulation was installed a carefully applied layer of polyethylene was installed using LESSCO receptacle box’s for all electrical penetrations and acoustical caulk as the means to secure the poly to the walls. Plywood was used in some areas for the air barrier.

Results of blower door test prior to Sheetrock installation
As we traveled to the project site on November 11, 2008, we wagered on what the results was likely to be once the test was completed. The initial results prior to finding a open vent stack and a few volume calculation errors was 1.1 air changes per hour. Once Mike LeBeau and Dave Joice fired up their handy dandy
infra-red thermography cameras they were able to find where the air leaks were occurring. The blower door test puts the house under negative pressure using the blower door set-up shown below.


After we sealed up problem areas and set a strategy for what needed to occur next, two weeks later we were able to accomplish a .6 air change per hour result, well within the range of comfort that we could meet and even exceed the results required by Passive House design standards once the sheetrock and final finishes were complete. Two areas of concern that we are still investigating include the window air leakage problems and the fact that we used a .4 air change per hour as the baseline for the PHPP energy modeling data. We are hopeful there are easy answers to fixing the air leaks occurring in the windows and we are feeling confident that when the Sheetrock is complete we will be able to reach a .4 in lieu of .6 air changes per hour result.


Passivhus US Conference Tour & New York Times Article


This past November I attended the 3rd North American Passive House Conference in Duluth, Minnesota; with about 150 attendees from all over the world. There were terrific presentations, and exhibitors showing Passive House products. The conference organizer, Katrin Klingenberg and Mike LeBeau, asked if they could organize a tour of our house. I was expecting to ride the bus with the group of attendees; however, due to popular demand the tour bus was full so I offered to drive a couple other interested attendees to the site. My visit, during the ride, with Gary Cole & Russ Hellum resulted in learning more about what other parts of the country are doing to create high performance buildings and how they had discovered Passive House design as an excellent model to help them achieve their goals.

Passive House US is currently a grass roots group of individuals that are motivated in bringing an building design model to the US that has proven and measurable results regarding what is needed to create an extremely low energy consuming home.

On Saturday, the /New YorkTimes/ carried a front page article on Passive House
(http://www.nytimes.com/2008/12/27/world/europe/27house.html if you have
not yet seen it). The article, incidentally, was the /Times/' second most widely emailed story of the entire week and featured many of the people I met at the conference. The only questionable part of the article was the indication that the first Passive House US Certification occurred in California this year when in fact, to my knowledge that honorary position has not occurred.


There were about 60 people that joined me on this tour, and I learned as much from them as they may have learned from us regarding the challenges that Passive House has in the US to become as successful as it is in Europe.
Katrin Klingenberg and Mike Kernagis co-directors of PHIUS wrote a summary of this past years events, which I think nicely summarizes the years successful story. They were kind enough to allow me to include it in my blog.
Dear Friends,
We have been experiencing an exceptional quickening during this past year in interest in energy efficiency and independence, and in the Passive House concept. We'd like to extend very many thanks to all of you for your enthusiasm for the Passive House standard and the opportunities that you see in it and that you have already uncovered.
May it be business opportunities, environmental protection, energy independence and peace, climate change, or passive survivability that motivates us, together we have created a nationwide Passive House movement with an incredible energy and potential.
We established the Passive House Institute US in early 2007 to introduce, advocate, promote and educate about PH technologies when only a handful of people here in the US had heard about it. That handful has now grown into a sizable community. 2008 was the year when PHIUS was authorized by the German PHI to certify projects in North America, which is crucial to being able to uphold the performance standard. The Passive House Certified seal of approval now provides an independent verification for a project, confirming that the standard actually has been implemented successfully and the goals have been reached.
This year we've traveled extensively to promote Passive House and its benefits, held many presentations, spoke at green building and energy efficiency conferences, conducted PHPP workshops. This was also the year when we introduced the Certified Passive House Consultant Training, realizing that at this stage in the development of the broader Passive House Alliance it is crucial to expand the base of those who know how to apply the principles of architectural and mechanical system design. We started the training: 17 graduates finished the class and are now looking to plan and build their first Passive Houses. A second class of 20 will finish soon. The planned training series have tripled for 2009 and we have a long waiting list of people from across the US and Canada. As demand for super-energy efficient buildings increases, there will be a need for skilled and talented professionals to meet it at many levels. The Passive House Consultants are an early branch of a young Passive House Alliance.
This year, the Alliance founder's group met in July and in November. It became very clear in discussions amongst them that a critical mass of individuals, businesses, organizations, city
governments and, perhaps most crucially, /built projects/ (as illustrated in our newly-released book "Homes for a Changing Climate") had been reached. We have been, are, and will continue encouraging and helping regional PH interest groups across the country (California,
Minnesota, Cascadia, DC-area - to mention a few). Some have already let us know that they are ready to form local affiliates to further PHIUS' mission and to advocate for Passive House becoming a voluntary standard for new and retrofit construction here in the United States. And Passive House in the US is outgrowing its single-family shoes: the first 38-unit apartment building is scheduled to break ground in the Spring of 2009. A huge step!
We had a very successful 3rd North American PH Conference this November in Duluth, Minnesota; with about 150 attendees from all over the country (and many from beyond), terrific presentations, and an exhibitor group that doubled from the previous year, showing truly
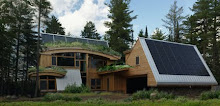
cutting-edge Passive House components. Such components are now beginning to be available in the US, which is great news. During the tour of built Passive House projects, the PH community had the opportunity to visit the Isabella Lake Home, now officially a certified Passive House after recently passing its blower door test; and the Skyline House, which narrowly misses the standard but is a truly outstanding building.
PHIUS has also been consulting with the University of Illinois Solar Decathlon Team on the entry for '09: The team committed itself to putting a certified Passive House on the Mall, not only for Washington, but also for Illinois, once the house returns to the campus. We hope this is going to be a great national opportunity for Passive House in September of 2009!
Thanks to founding Alliance members there is now a PHPP available entirely in English units - no more metric angst - and climate data, including heating and cooling load data, is now being generated for a good number of cities in the US. We will make those available in the new
year.
In light of the extraordinary developments of this past year Mike and I have decided to restructure PHIUS to adapt to the exploding interest. That's in progress and by the end of January we hope to provide those of you who are interested in joining our efforts with an affiliate
application, procedures and policies to assure a consistent message. Individuals and organizations (professionals, engineers, builders, manufacturers, firms, industry groups) will also be able to participate, as we develop other branches of the PH Alliance.
This is a big step for us. Thank you all for your patience, for your invaluable advice, engagement and investment of time and money during the founders meetings, as well as your financial support to get this transition on its way. We will probably require some more of your patience until the national organizational structure and transition is fully functional and in place. Please know that we are making our best efforts and are very excited to take things to the next level.

Go, go Passive House...Greetings from the PHI in Darmstadt, where Kat has just concluded fruitful meetings with Dr. Feist. Thank you all for a phenomenal year.
We wish you very happy holidays and a happy new year, and we're looking
forward to the next one!

Kat and Mike

Visit the Passive House US website to get current updates on the progress this energetic group of individuals are making to help change the negative impacts we have on our built enviromnets. http://www.passivehouse.us/passiveHouse/PHIUSHome.html

Sunday, October 12, 2008

Green Roof - "The Devil is in the Details"


“The Devil is in the Detail” best describes the lessons learned regarding the design, construction and maintenance of the Green Roof for this project.

The intent of including the green roof in our project was to experience first hand the benefits and challenges of this roofing system. The proclaimed benefits of a green roof as follows:

  • They return the biomass that was lost during the development of the project
  • They moderate the surrounding and internal temperatures of the building
  • They provide a place in urban areas that allow for growing of crops & visual appeal
  • They help to manage the required on-site storm water retention regulations
  • They have a high degree of aesthetic appeal

    During the process of including a green roof in the design I discovered the following challenges:
  • The soil science of growing plants on a roof is extremely complicated and needs to be simplified to help owners make informed decisions.
  • Green Roofs have only recently been third party tested to verify that they indeed manage on-site storm water retention. EB News (Environmental Building News) Volume 17 Number 10, shared the results of the recent findings on this subject.
  • They found that while all the tested roofs in the study were capable of significant thermal moderations, some held water well while others were barely better than conventional roofs at preventing or slowing runoff. When the roof was designed to include larger planting-medium retention cups, low drainage-hole area in the drainage layer, and a high proportion of perlite or soil absorption material in the planting mix it correlated with high water retention.
  • This same article verify that indeed the green roofs do a good job of reducing the roof temperature of the building in lieu of a black or even white roof. This can greatly affect the possible benefits of large commercial buildings that are attempting to cool their buildings or reduce urban heat island effects.
  • The embodied energy of Hydrotech’s Green Roof growing medium needs to be improved. The production of intensive energy using material included in their soil media seems to be counter productive to the sustainable doctrine.
  • The recommended hot applied water proof membrane system for the Green Roof is not that much different than a high quality hot applied built-up roof system normally specified for commercial buildings. The main difference I found was that the recovery board that goes over the hot applied water proofing has a root inhibitor included in it. Two types of hot applied systems seem to be the main ones on the market, one has more recycled material included and the other has less but is more cost competitive. The less costly one also has fewer features that make the quality control of the application of the product more reliable.

    We had a bit of trouble on our project, the contractors selected for the project seemed to have had a communication breakdown and the product installed was not the Hydrotech 6125, Hydroflex RB II, associated water retainage cups, (GR 15 Garden Drain), and the root barrier filter fabric that was specified. So after a couple of weeks of steady conversations with the contractor and product representative for Hydrotech we added the correct material over the originally applied material and now have over 400 mils of roofing material on our roofs in lieu of the 210 mils intended. Which for those not familiar with the unit measure of mils 400 mils is nearly ½ inch of material.

    One of the best outcomes of going through the process of selection and constructing a green roof was the introduction of product called GaiaSoils. This is largely credited to my sister-in-law, Mem, sending me an earth day news article from the NY times that I am attaching for your readingpleasure. GaiaSoil is an amazing soil, it will be replacing Hydrotec’s suggested soils mixture with a soil that is made from non-toxic recycled expanded polystyrene foam, coated with organic pectin, mixed with high quality finished compost. Here is the comment from the Hydrotech’s soils scientist after reviewing the GiaiSoil specifications:

    “Technically for plant survivability there is no issue with the soil. They do recognize that there may situation where this soil can be utilized but with strong cautions.

    The draw back;

    "American Hydrotech has looked into this soil and similar soils on the market place and they have chosen to not use or recommend the soil. The issue that we have is with wind uplift on roofs and wind erosion. When the soil is dry there is too little weight holding the system in place. I would recommend using a permanent erosion control mat to hold the soil in place to prevent the soils and insulation from blowing off the roof. The Garden Roof is a Protected Roof Membrane Assembly and there are guidelines stating the minimum weight or ballast that is required to secure a roof in place. In American Hydrotech’s Binder under the insulation section there is Dow Chemical’s Tech Note 508 that covers most of the conditions for wind uplift.

    The last draw back on the soil is the moisture retention will be less than our soil or typical green roof engineered soil.”

    I decided after looking through the data regarding moisture retention that the amounts differed so little and since our site had very little exposure to heavy winds the use of a more environmentally sound soil was worth the small risk we would be taking. Thus, for our situation I determined that the use of a recycled sytrofoam from New York Cities fish market was a better soil medium component than the use of Hydrotech’s recommended shale type soil mixtures that need to go under tremendous heat to create the “cat litter” type substance that they use.

    Finally, I need to thank Nathan Salo for building a overflow drainage system for our green roof that will be admired by this architect for years to come.

    From the wood plywood deck up is the assemble used for the green roof:

    # 8 & 7 -- Hydrotech 6125 EV-FR– Monolithic Membrane is seamless, fully reinforced rubberized asphalt membrane. It consists of one coat of membrane at 90 mils into which Hydrotechs Flex Falsh F (a spunbonded polyester fabric) is embedded. A second coat of membrane is then installed a 125 mils. The total membrane thickness is 215 mils.

    In our case since they installed a Carlisle Coatings and Waterproofing CCW-500 hot applied Liquid Membrane 305364 in lieu of the Hydrotech 6125 we put the MM6125 over the Carlisle product for a 400 mil application.

    #5 -- Hydrotech RB II – a heavy-duty, granular-surfaced, modified asphalt sheet with an integral root inhibitor blended in. It is used when intensive applications or whenever aggressive root structures are anticipated. It is also used in sloped applications, as the granular surfacing provides additional slip resistance.

    #4 -- Drainage/Water Retention Component GR15 – These are water storage troughs, or cups, on the top side of the panels that retain additional water for use by the vegetation. Diffusion holes through the panels allow air circulation and water vapor to move up into the root zone.

    #3 -- Filter Fabric - This helps to prevent soil particles from washing through the system and potentially causing drainage layers and drains to become clogged.

    #2 -- 6” GaiaSoil – This is the growning medium for the plants, the portion of the soil that both retains and drains water as well as provide the minerals to the plants.

    Walking trellis -- Recycled content garden trellis’s that will be installed horizontally over the GaiaSoil prior to the final lay of local compost. This will assist with the erosions control and compaction of the soil as you walk on it to maintain the plants.

    1 ½” Compost -- This will be continually applied to the soil over the years as the need occurs to keep the plants healthy and growing properly. Similar to what you would do for your own garden plants in your yard.

    Plants will be selected with help of Gus Blumer the Landscape Architect for this project and Allyz Kraemer my friend the boreal forest biologist.

    We will be providing rainwater collect water to irrigate the green roofs through hose bibs and drip lines provided on the roof.

Window & Door Installation


The delivery of the infamous Mueller doors and windows occurred around Labor day of 2008. It felt similar to having a newly adopted child show up in your life. The windows and doors took a big trip on a ship from German to Montreal and then trucked to Minneapolis and finally driven to Isabella. Miraculously they arrived in one piece. They were big, beautiful, heavy and amazingly engineered.

Only a visit to the ecohome can do these works of art justice, plan a trip to Isabella to experience the integrity of these castle worthy doors and windows.

Nathan, Jose and Nick, the contractors, key to installation of these doors preformed no less than a miracle in the effort to install these 2000 lbs window units. It took 20 guys to unload them from the containerized truck.

Exterior Stone Collection & Installation

One of the lasting memories John and I will have of this project is the experience we had selecting and collecting the stone for the exterior finish of the ecohome. With 1,600 sq ft and about 1 ½ ton per 30 sq ft. we collected 90 ton of stone, which is why we will hold on to this memory for years to come.

The two types of stone we considered using for the project included the iron ore waste rock from Cliffs Natural Stone Company in Hoyt Lakes and the hand picked natural field stone that came from the site and near by gravel pits.

While the waste rock at the nearby iron ore mines were extremely appealing due to its intriguing story and shear beauty, (oldest fossils in the world & 35 miles of waste rock from previous years of mining ore at Cleveland Cliffs Mining Operation), the cost and hauling of the rock were just not meant for this project.


Instead, John, Nancy and Danny Two Otters, (Danny is a tribal member of the Bois Forte Band of Ojibwa Indians), spent five days hand picking rocks from our site, the neighboring site owned by Dan Spina and a site about 10 miles away. We are extremely pleased with the workmanship that Keith Johnson of Mesabi Masonry Inc,andhis crew performed installing these local stones.


Danny was the piece of the stone picking experience that made it all worth it, for those interested in the commentary that he added to the process, corner me someday and I will share it with you.


Friday, October 10, 2008

Solar Thermal Storage System - Zero Energy Home Challenge

I am updating this portion of the blog to give you the latest information regarding the Solar Heat Storage and Delivery System. One of the updates that may be of interest is the diagrammatic drawing of the system, created by Mike LeBeau, it most definitely helps to understand how we are building the system. The controls for the system will be added to the drawing in the near future.

Additionally, I applied for an Innovation Credit for this system through the LEED for Homes rating system program and have receive notification that it will be allowed for an additional credit. I had applied for several others, but have learned through this process that only extraordinary energy saving or environmental improvements are being accepted, it was communicated to me that of the 2000 + requests received as of March 2008 only 4 or 5 had been approved. This was one of the approved Innovative Credits.

Solar Heat Storage & Heat Delivery System – Innovation Credit Request Documentation:

There are 92 solar heat collector vacuum tubes planned for the roof that will be collecting an average of 172,500 BTU’s per day that that there is full sun. We have assumed that there will be at least 120 days worth of full sun available for producing heat available for long-term storage, outside of the times when it would go directly to either short-term storage or to an end use. This will mean that we can put around 20.7 million BTU’s into storage per year. We estimate that approximately 2 million BTU’s per year will be needed for heating of domestic hot water.

The energy model that we ran for this home indicates that we will need 9.7 million BTU’s annually for space heating. This is 4.6 kBTU/sq-ft. or 15 kWh/m2

We have 9,000 cubic feet of a sand and taconite mix (approximately 50:50) under the foot print of the main portion of the house which is insulated with 16 inches of expanded polystyrene (EPS) on all six sides and has cross-linked polyethylene (PEX) tubing running horizontally at every 9 inches vertically through the sand and taconite. The taconite bed is on the top and the sand bed on the bottom with 2 inches of extruded polystyrene (XPS) separating them. The 2 inches of XPS between the two beds was installed only for testing purposes so the heat storage performance of the taconite and sand beds could be evaluated more-or-less independently. Sensors will be installed at various locations in each bed to monitor performance and fine tune the control strategy.

Heat storage capacity for the space under conditioned space is estimated as follows:

Energy density of water = 4,190 kJ/m3 oC (www.engineeringtoolbox.com)
Energy density of taconite = 2,560 kJ/m3 oC (www.engineeringtoolbox.com)

Specific heat of sand = 830 J/kg oC (www.engineeringtoolbox.com)
Density of packed dry sand = 1,682 kg/ m3 (www.simetric.co.uk)
Energy density of packed dry sand = 1,682 kg/ m3 x 830 J/kg oC = 1,396 kJ/m3 oC

950 sq-ft x 3 feet= 2,850 cu-ft total volume of sand
950 sq-ft x 3 feet= 2,850 cu-ft total volume of taconite

2,850 cu-ft x 7.5 gal/cu-ft = 21,375 gal

Assuming that the energy density of sand is about 0.333 that of water:
21,375 gal x 0.333 = 7,118 gal of water storage gal equivalent

Assuming that the energy density of taconite is 0.611 that of water:
21,375 gal x 0.611 = 13,060 gal of water heat storage equivalent

Combined total heat storage = 20,178 gal water heat storage equivalents

20,178 gal water x 8.34 lb/gal = 168,285 lb water heat storage equivalent

Assuming that an 80 oF maximum usable temperature range is available, the total heat that can be stored in the sand and taconite beds combined = 13,462,762 BTU

A closed loop heat transfer circuit will transport the heat from the roof top solar collector to a flat plate heat exchangers and a pair of insulated water storage tanks in the utility room basement. A heat transfer fluid, consisting of propylene glycol and water, will be directed first through a heat exchanger coil in the bottom of an 80 gallon indirect fired hot water tank. During the non heating season, once the 80 gallon tank reaches a desired maximum temperature of 150-160 degrees the heat transfer fluid is redirected to a flat plate heat exchanger that will direct the excess heat into the sand/taconite thermal storage area. During the heating season the heat transfer fluid will be directed to a coil in a 400 gallon bulk thermal storage tank. When that larger tank reaches a desired operating temperature any surplus energy will be transferred from the tank and into the closed loops of PEX tubing going through the sand and taconite beds via a separate closed loop that is common with the space heating distribution system. Energy will move to the storage bed when there is a surplus and be removed from it when need for space or water heating. The 400 gallon tank will be used to create the desired temperature needed for space heating by calling for heat from the heat transfer fluid coming from either the sand/tanconite thermal storage area or directly from the heat transfer fluid coming from the solar collectors.

Since the heat will only flow from hot to cold, water in the PEX tubing in the floor slab will have to be somewhat above the desired slab temperature. If a slab temperature of 75 oF is desired, water at 80 oF or above should be sufficiently hot. To supply water at this temperature, the sand and taconite beds will need to be somewhat above this temperature, perhaps 90 oF at a minimum. Based on the heat capacity storage calculations, if the sand and taconite beds were to reach 170 oF by late fall, the two beds combined could release about 13.5 million BTU without their temperature not going below 90 oF. Assuming that one third of the approximately 21 million BTU of heat that is anticipated from the solar collector vacuum tubes is lost through the 16 inches of EPS around the sand and taconite beds and elsewhere in the system, there should still be about 14 million BTU available for space heating and domestic hot water, which is about 2 to 3 million BTU more than the energy models predicts for the total annual space heating and domestic hot water needs of the house. Should there be any excess heat, to prevent overheating of the sand and taconite beds, the heat can be diverted into the garage floor slab, which has PEX tubing in it to keep the garage warm and its floor ice-free in winter.

A small electric boiler will be integral with the solar heat collection system and will supplement and back-up the solar thermal system. The location will be next to the water storage tanks. This boiler will back up the domestic hot water tank, if ever needed, by heating the 80 gallon tank via a second heat exchanger coil suspended near the top. It will also back up the space heating system by working in parallel with energy from the solar thermal system either from the larger storage tank or from the sand and taconite long term storage bed. The electric boiler will be connected to a 8kw propane powered generator for the rare situation when the power is out for a long period of time and the system is not capable of keeping up with the electric loads for the ecohome. An electric boiler was selected because of the ability for electric boilers to be size in smaller increments than propane boilers, making it more appropriate for the small loads needed for this project.

The electric boiler will be controlled by the Sunny Island device to allow it to switch into operating mode should the battery backup or grid power go down.

The 400 gallon water solar storage tank is also important for heating the home during the shoulder heating seasons, spring and fall. Installing a system that allows the heat collected to go directly into the 400 gallon tank and then into the floor heating coils was important to allow quick access to the heat when the sand/taconite is likely to be loosing capacity during the spring and the sun is gaining its strength. And conversely, when the sun is loosing its strength in the fall and the taconite/sand thermal storage is at capacity, the solar heat is more efficiently sent right to the in-floor heating system.

Friday, May 23, 2008

Enjoying the Power

Yahoo! we are on line and making green electricity as of May 21, 2008.


For those of you interested in how we will be making electricity for our Lake Home here are the details:

We will have an on-grid PV system. The PV system will be connected to Cooperative Light and Power Association’s standard electrical grid system. In addition we will have 12 sealed lead acid batteries, (the type of battery that does not require regular maintenance), that will give us about a weeks worth of storage should the grid go down and the need for power becomes critical.

A special meter is installed to track and document how much kwh is being sent back to the grid. The billing or buyback is reconciled per billing period which usually is each month. The meter cost $800.00

All electrical work will be in full compliance with the MN State electrical code and best industry practices.

There will be two SMA Sunny Boy 6000U Inverters located in the mechanical room. The inverters change the Direct Current (DC) coming from the PV panels to Alternating Current (AC) at a voltage and frequency that is synchronized with the utility power. These inverters along with two SMA Sunny Islands 4248U units will allow us to interface with the sealed lead acid batteries. The addition of batteries to a grid inter-tie system allows our solar equipment to continue to operate during a utility power outage as well as store energy for nights and cloudy days.
There will be 42, Sanyo 200W PV modules each about 13 sq. ft. in surface area, for a total of about 540 sq. ft. of PV modules with a peak output of 8.4 KW. We should be able to generate an average of around 925 KWH per month or 11,000 KWH per year, and we are assuming that we should only need 200 to 500 kwh per month, which means we should be able to sell 5,000 KWH per year or more back to the grid.

Currently we are working with Cooperative Light and Power to determine the rate in which they will be buying back the electricity. This is a new customer agreement for them so we will be setting precedence with this agreement. Currently they are offering a 7 ½ cent per KWH buyback rate. Their standard buying rate for customers is 9 ½ cent KWH. We have to buy green power from them at a 1.5 cent per KWH if we were to purchase it from the Coop in lieu of making our own. State Statues in Chapter 3875 Public Utilities Commission regulates how to get paid for cogeneration and small power generation situations so we are researching this document and verifying with other utility companies their buyback rates. Stay tuned.

It costs about $7.00 per KWH, (after rebate it is $5.10 per KWH), to install this system. If you do that math, it indicates that yours and our grandchildren will be the ones reaping the benefits of this system, not John and I. We estimated we will be paid about $500 per year for electricity; we think we will be using that same amount, which means that it will take 40 years to pay for the system, this assumes some level of speculation regarding increase electrical costs. And who knows, with the increasing cost of energy these days, it’s anybodies guess how quickly we will ultimately see the return on our investment.

The reduction of CO2 emissions due to the installation of this system in lieu of getting it from a coal fire electric plant is estimated to be 22,000 pounds of CO2 per year.

Sanyo HIT (Heterojunction with Intrinsic Thin Layer) Photovoltaic modules are among the most efficient in the industry with a module efficiency of over 17% on the 200 watt version. Sanyo HIT cells are hybrids, made of thin mono crystal silicon surrounded by ultra-thin amorphous silicon layers.

We are confirmed to get a $16,800 rebate from the state for the PV system and a $4,000 rebate from Co-op Light and Power.

Saturday, April 5, 2008

Upper Roof Heavy Timber


Hooray, the glue lam timbers for the upper bow roof are installed.

The heavy timber framing for this project is Forest Stewardship Council, (FSC), Certified wood for all the glue laminated timbers that were not exposed to the visual eye. We selected Alaskan Cedar for the exposed heavy timbers. This included the face of the upper bowed roof, the face of the master bedroom bowed roof and all of the heavy timber for the porch framing. The intent is to allow the exposed wood to weather naturally, eliminating the need to put a finish on the wood and thus eliminating the need for long term maintenance. The heavy timber was supplied by Timberweld, the decking for all of the roof is also FSC Certified supplied by Certified Wood Products, Inc. out of Maple Grove, Minnesota.

Sunday, March 2, 2008

The Blower Door Challenge


The excitement is escalating. When John & I surveyed the progress being made to date, we decided it was going to be a shame to cover up such fine carpentry with interior finishes. Nathan and the crew of carpenters can not be commended enough for their fine craftsmanship and the attention to detail that they are giving this project.
We as a team are determined to prove that we can meet or exceed the air tightness required by the The Passivhaus Institute. They require that the air change rate of the building shell is limited to 0.6 air changes per hour, in reference to the buildings volume, at 50 pascal pressure differential. Construction to this tightness will be a challenge indeed because it is about 20 times tighter than a typical home construction. A blower door test after the construction is complete will indicate whether we have succeeded.

Chairs for Childern


Not so many months ago our good neighbor and partner in the Lake Home Association Steve Bystedt introduced me to a guy named Tony Mancuso. And after one of those spontaneous combustion type evenings, where we solved all the worlds problems and while creating self-induced a headaches for the next morning, I quickly arrived at the conclusion that he was no ordinary dude. I will not indulge you the reasons for this conclusion because the discovery of his hidden talents and good nature would be short changed if I tried to commit it to print. Suffice it to say you would also do well to cross paths with Tony some day.

I share this with you because Tony is now an integral part of this project. He called one day to ask if he could use some of the wood we had harvested to make chairs for children as part a charitable giving program that he has made furniture for in the past.

After we arranged to have the logs cut into 3 inch planks, thanks to Joe Ernst and Dan Spina’s newly purchase portable sawmill, Tony picked up the wood and is ready to transform them into quintessential furniture.

Tony has offered to help us use some of the harvest wood to create yard furniture and help me try and create interior designs that use salvaged material as our theme.

Another of his many attributes is his passion for environmentally friendly building design. Tony is Minnesota’s St. Louis County Director of Property Management, he has been busy improving the energy performance of municipal buildings since he has t

aken the position.

Sunday, February 3, 2008

Progress on Jan 26, 2008 - John's Birthday


]


The garage is taking shape, before to long we will be able to install the PV panels out of Mike's warehouse and install them on the garage roof. At which time we will be able to start making our own clean energy electricity for the project or sell it back to the power company if we are making more than we use.


Nathan & Brad will be ordering the upper roof Glue Lams this week.


Saturday, February 2, 2008

Window Selection Update

Update regarding window selection Jan 26, 2008

After gathering additional research regarding using Alpen glazing and Mueller windows we have discovered that Alpen indeed has made tremendous progress regarding improving window performance, however it appears that the glazing is the reason they get the performance results they are claiming and the frames do not compare with the Mueller window regarding performance.

The National Fenestration Rating Council (NFRC) is the label to tell you the energy performance values for the entire window system. All the values on the NFRC label represent the rating of the windows/doors as whole systems (glazing & frame). www.nfrc.org/label

· The NFRC rating for the highest performing Alpen windows, (north facing cold climate window) as mentioned in an earlier discussion has a U factor of between .10 and .14 depending if it is fixed or an operable window.
· The equivalent rating for the Mueller window is .15 (This is using the Mueller 3-wood frame window assembly with standard European glass, not heat mirror glass as in the Alpen window).

It became apparent that the real benefit of using Alpen was for their high quality glass. The center of glass .10 goes along way in helping the overall unit perform as well they do. So we asked Klaus to check on his ability to get an equivalent glass product and we asked Alpen to send us the best they can do for glass they would supply to have installed in the Mueller window frames. Here is what we discovered:

o Alpen glass (Alpen performance glazing, Inner/Outer PPG 3/16”, Starphire Low Iron Glass/Double Heat Mirror, Suspended Coated Film filled with Kryptonite):
South facing
· .11 U value
· .53 Solar Heat Gain Coe
· 1 ½ inch
North, West & East Facing
.08 U value
.44 SHGC

o Mueller glass (Similar Heat Mirror and glass assembly)
South facing
.088 U value
· .52 SHGC
North, West & East Facing
.07 U value
.37 SHGC

With some adjustments to the window operation and design we think that the better overall option will be to use the Mueller window with the European glass options
described above, the overall NFRC will likely be in the .1 U value range, especially if we improved framing details as shown in the attached drawings.

Friday, February 1, 2008

Innovative Ideas for Site Development


This is one of the Innovation Credits we hope to have blessed by LEED during the Certification process for this project.


Intent: Reduce the amount of development to the site by creating shared use agreements for amenities or utilities.

Proposed requirement for compliance:

One of the strategies for our project was to reduce the amount of development to the site by creating shared use agreements for amenities or utilities with the Superior National Forest Lake Homes, (SNFLH), (of which we are currently part owners of one of the Lake Homes). The Home Owners rent out the condos when they are not using them to those that want to recreate in a silent sport, eco-tourist setting.

We especially wanted to eliminate additional development to the Lake Shore so our agreement with the Lake Home Association is we will, from this point forward pay 20% for future upkeep, development and maintenance of the Lake Shore amenities, (dock, sauna, fire pit, boat house, boats and trails to the lake shore). We will also be contributing to the ski trail maintenance and snow shoe trail maintenance in conjunctions with the National Forest Lodge property owners, which is a private winter recreation resort with which we have drive and assess easements.

The entire combination of properties, National Forest Lodge, Superior National Forest Lake Homes and our Property have conanance on the properties to restrict the use of the properties to non motorized recreational sports, or what we have referred to as silent sports. The properties are surrounded by the Superior National Forest and are only 5 miles as the crow files to the “BWCA” Boundary Waters Canoe Area, a Federally protected Wilderness Area that is also a non motorized wilderness area.

To encourage and bring awareness to the need strive for a zero waste ecolocial system, we built a new recycling and waste management building on the property of the SNFLH’s. We have an agreement with the Home Owners Association that we will share in the waste management costs with them so again we do not add to the site development in creating our own.

Another attempt to reduce site development included developing a shared access with the already built roads into the National Forest Lodge and SNFLH sites. In lieu of building a 400 foot road to access the site from Highway One, we built a 110 foot road from the road that existed for NFL and SNFLH sites. There were many older growth read and white pines that were spared approaching the site planning in this fashion. Road maintenance will also be shared with the adjoining properties.

Finally, we installed conduit for a power line and a communications line between our new eco home and the SNFLHs to allow us to have a future opportunity to support the Lakes Homes with Green Energy should we be able to produce enough reduce the electrical loads for the Lake Homes in the future. It will also provide for a little bit of back up generation should we want to provide this in the Lake Home off of our battery storage system included in our design of our Lake Home. Additionally we will be able to use the satlite communication system already provided for the Lake Homes again reducing the need for more dishes and equipment. We will also share in these cost with the Lake Homes to help off set the cost for all property owners.

Proposed documentation to demonstrate compliance:

Site plans and property descriptions, governance agreements, and photos of installation of Waste Management Facility and power lines to the Superior National Forest Lake Homes.

Description and estimate of the benefit or impact provided by the proposed measure:

Between 15, 000 sq-ft to 20,000 sq-ft less site was developed due to the measures described above. Encouraging the recycling of waste through ease of accessibility, operation and maintenance will benefit the environment by improving and educating others to make unwanted or used material a zero waste proposition. By reducing the need for duplicity of materials or equipment we will be reducing the overall embodied energy required for this project.

Sunday, November 11, 2007

Winter wins, concrete pour comes in second


The pressure is on!


Tim and Don from Johnston Masonry get the November recognition award. While I grumbled and groaned over losing slab pouring opportunities in October to wet, wet, wet, and more wet weather, they prevailed in the installation of the concrete slabs in early November. Sadly we did have to pour heat energy on to the slab due to the winter that arrived the day of the pour.

One of the challenges was to pick a color for the concrete as well as get the high performance edge details installed as part of the design. As many of you have experienced, picking colors is a painful experience. And for this pick I have to admit, I winged it. The majority of the flooring is intended to be polished concrete, this is in part for the efficiency of thermal radiant heat transfer, but also to reduce the floor finishing material required for the project. Like everything in life today, the selections are overwhelming with respect to approach and potential appearance options for polished concrete. However, when ecological awareness is part of the equation, the choice of color was to simply add an non-toxic additive to the concrete in lieu of later painting or staining with potentially harmful materials. The color we decided to use was “Beach Sand” from Prism, which is produced with a iron oxide-based additive mixed into the concrete just prior to the pour.

I had intended to have concrete samples cast with different color additives and then polished, but ran out of time and good weather opportunities. In the end, I just had to wing it with the help of Tim and Don’s crew simply hoping for the best. Don claims that if I pick my lighting right, I can have the floor look almost any color I want it to be. Not a bad idea. It looks a little like baby dung right now, but I am hoping the ugly duckling will turn into a swan, before it is all over.

Polishing concrete as a floor finish has been used more and more frequently recently for the obvious reasons. Finishes are achieved through grinding the concrete until you get the polished result you are looking to achieve. Hand grinding of the edges is needed unless, like our situation, you plan the casework, or walk-off matting and interior walls to cover up the edges. This greatly reduces the cost of the polishing process. Grinding can occur at any stage during the life of concrete; however, it is easiest to do a couple weeks after the pour.

Getting too creative with the coloring or distribution or seeding of the surface with other materials requires the gods to be with you throughout the process. Many things have to go right for you to get the appearance a precise product, concrete has a way of changing very quickly due to the slightest variable. Wind, heat, water, color, covering, cold… Though concrete is a very touchy product, if you prevail, wow, what a durable amazingly beautiful end result.

We will begin grinding once the all the exterior building envelope is complete.